Adding an email account to Microsoft Outlook
 Just helped a friend out with adding an email account to Microsoft Outlook. Figured I would write up a quick tutorial and share it with you all.
*Note: You can click on the pictures to see larger versions.
Why?
Maybe you just installed Outlook or maybe you have more than one email account. Maybe you found out about an account you haven’t used in a while. Any way you slice it you may want to add an email account to Microsoft Outlook. These instructions will be for Outlook 2013, still should be familiar for other versions.
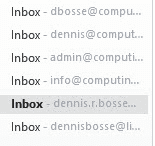
 Here is a look at my Outlook “inbox” with a few email accounts already setup. This gives me one location to check all my email very easily. There is no need to go to different websites and check using an internet browser or webmail client. Sign out of one, then log into another… easy one stop shopping.
What you will need
- You will need to know the username and password for the email account you wish to add.
- You will need to have access to the mail server settings for that account
– If you do not know the mail server settings, you can search the web for the information by using the domain name (part that comes after the “@” in your email address). Your search should look like this: “Mail server settings yahoo.com”
– Another option – try looking up HERE – I just found this and checked a few. Seems to be pretty good.
Process
Start up Outlook. (If you do not have any accounts created a setup wizard will run and walk you through similar pages for the settings.)
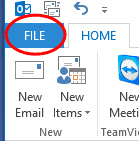
In the upper left corner of Outlook, click on “File”
Next, click on “Add Account”
 You will now see the Add Account dialogue box to auto add email accounts. This is similar to the wizard that will run when you start Outlook for the first time.
If you wish to try the auto add function, fill out the information as requested:
- Enter your name as you wish it to appear when you send emails
- Enter in the email address for the account you are adding
- Enter in your password for this account, retype the password on the second line
“Next” will now be highlighted and you will be able to click on it. This will have Outlook go out and try to auto add the account using the setting it can determine from your mail server. I have found this works about 50% of the time. - Just as easy to click on the radio button and enter the settings manually if you know them.
To manually add the account
- Click on the radio button for “Manual setup…”
- Click on “Next”

Choose server
If you are not sure, use #3 for Pop or IMAP. These are your more typical options. Exchange type services, usually from a corporate environment or Microsoft itself, are specific types of services. You will be notified to setup the account with these options from your administrator or email provider. If you have not seen or heard of this, stick with #3.

POP and IMAP Settings
Similar to the auto add page, you will need to add your information.
- Name
- Email address
- Account type
- POP3 – think of this as a “copy” of what is on the server that only happens once. If it downloads here, typically will not be accessible on another device like your smart phone. (typical – we can change some settings, not covered in this lesson)
- IMAP – this is a copy that will “sync” or update back and forth. This is an easier way to keep information on multiple devices the same. All changes are synchronized with the server and updated on each device. This is the choice (if available with your service) to choose if you have multiple devices accessing the same accounts.
- Incoming / Outgoing mail server – see the section on “What you will need” above to determine what these settings should be for your account.
- Username – the ID you use to access your email. This can be your email address “dennisbosse@dennisbosse.com” or it could be just the first part “dennisbosse” this depends on the email provider and should have been given to you when your account was set up.
- Password – pretty self explanatory, enter in the password for your account, make sure to check the box for “remember password”
Once all the information has been added, the “Next” button will be available to click on it.
Notice the check mark next to “Automatically test account settings when Next is clicked. This will automatically go out and try to log onto the email server and send a test message. Leave this checked and click on “Next”.
Test Account Settings
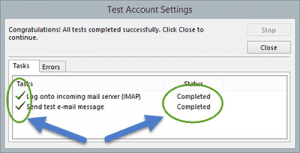
After you click “Next” from the previous step, Outlook will test the settings for you. If they are good, you will see the following.
If any issues were encountered, the check marks would be replaced with “X’s” letting you know there were issues. You will need to go back and verify the information is correct. The most common error is typographical errors. Yes, spelling counts. 🙂
Once the test is successful, you will see the following dialogue box
 Click on “Finish”
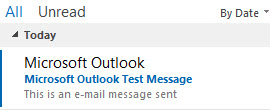
When you return to your inbox within Microsoft Outlook, you will now see the test message that was sent from the “Test Account Settings” step above.
The body of the message will contain the following:
“This is an e-mail message sent automatically by Microsoft Outlook while testing the settings for your account. “
SUCCESS!
If you found this useful, please comment below. Feel free to share with others too!
Thanks for looking…
As always, Truly Blessed!
-Dennis


